- Why brightness (nits) matters in bright rooms
- Anti-reflective coatings and optical filters
- QNED / Mini-LED advantage
- Screen finish: glossy vs matte vs hybrid
- Room setup tips to reduce glare and get the most from a bright-room TV
- Daylight calibration: step-by-step to optimize an already bright setup
- Final buying checklist for bright rooms
- FAQ
Best TVs for Bright Rooms (Sunlight and Glare Tested)
Watching TV in a sunlit room can turn a great TV into an unreadable mirror. This guide cuts through marketing and explains what matters for bright-room viewing: brightness, anti-reflective optics, panel type, room layout, and practical daylight calibration steps to get the best picture without buying something you don’t need.
Why brightness (nits) matters in bright rooms
Sunlight and bright ambient light raise the floor of perceived luminance in a room. A TV’s peak brightness (measured in nits or candela/m²) determines how well highlights and on-screen details remain visible against that elevated ambient level.
Key points:
- Peak brightness is not the whole story. Sustained brightness and how a TV maps HDR content (tone mapping) matter for everyday scenes.
- For SDR content in very bright rooms you’ll rely less on HDR peak highlights and more on the panel’s ability to produce sustained, punchy luminance.
- TVs with higher peak and sustained brightness retain contrast and color saturation in daylight; low-peak panels wash out or look dim.
H3: Peak vs. sustained brightness and APL
- Peak brightness: short-stint highlights (e.g., specular highlights).
- Sustained brightness/APL (Average Picture Level): what matters for scenes that are overall bright. Some TVs can hit very high peak nits but only briefly; others can sustain higher nits across most scenes, which is more useful under sunlight.
Anti-reflective coatings and optical filters
A TV with a high peak nit rating can still be unusable if reflections hide the image. Anti-reflective (AR) coatings and multi-layer optical filters reduce specular and diffuse reflections from windows and lamps.
What to look for:
- “Multi-layer” or “hybrid” AR coatings that both cut mirror-like glare and scatter remaining light. Manufacturers often describe these using marketing names; ask for details on reflection reduction.
- A good AR system reduces both intensity and sharpness of reflections. That means a reflected lamp becomes a soft, low-contrast patch instead of a bright hotspot.
- Polarization-based films and aftermarket filters exist, but they can affect viewing angles and color if not high quality.
Practical trade-offs:
- Strong AR coatings sometimes slightly lower peak perceived contrast in very dark rooms because they scatter some light. In bright rooms, the benefit is almost always worth it.
- Test the TV in your typical daylight conditions in-store if possible — reflections behave differently at different angles and with different light sources.
QNED / Mini-LED advantage
Since the mid-2020s, Mini-LED backlighting (used in QNED-branded sets and many flagship LCDs) has been the most reliable way to combine high brightness with decent contrast.
Why Mini-LED helps in bright rooms:
- Denser LED arrays (Mini-LED) allow many more local dimming zones than traditional full-array designs, improving contrast even at high overall backlight levels.
- Mini-LED panels can reach higher sustained brightness without crushing blacks as severely as older edge-lit or low-zone LCDs.
- When combined with strong AR coatings and good tone mapping, Mini-LED sets retain detail in bright highlights while keeping black detail acceptable.
How this compares to other technologies:
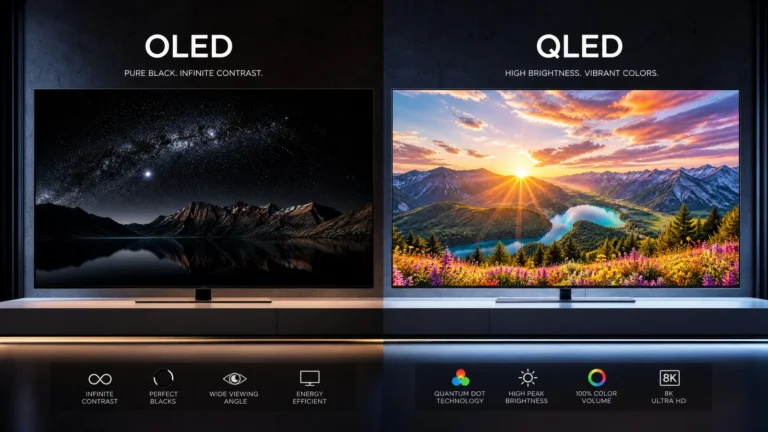
- OLED: superb contrast and viewing angles, but typical peak brightness is lower than Mini-LED. Newer high-brightness OLED variants have improved, but in direct sunlight they still struggle compared with top Mini-LEDs.
- Traditional QLED/LCD: with sufficient brightness and proper local dimming, they work well — but older designs with few dimming zones will show blooming and washed-out blacks.
- MicroLED: this is the ideal for bright rooms (high peak, pixel-level emissive control), but consumer availability and prices limit practicality for most buyers as of 2026.
Below is a compact comparison to help choose a direction.
| Panel type | Typical peak brightness (general range) | Reflection handling | Contrast in bright rooms | Best use-case for bright rooms | Downsides |
|---|---|---|---|---|---|
| Mini-LED / QNED (high-end LCD) | High (often highest sustained brightness) | Good with AR coatings | Strong — good local dimming reduces wash | Living rooms with lots of daylight; HDR highlights visible | Possible blooming vs. emissive tech |
| QLED / bright-edge/full-array LCD | Moderate–High depending on backlight | Moderate — benefits from AR filters | Decent if many dimming zones | Budget-conscious buyers who want bright screens | Fewer dimming zones can cause blooming |
| OLED (incl. brighter evo variants) | Moderate (improved in newer models) | Very good optical coatings help; glossy screens reflect more | Outstanding contrast in controlled light; weaker in direct sun | Rooms with window treatments or indirect sun | Lower peak brightness than top Mini-LED; risk of reflections |
| MicroLED / emissive | Very high (best of both worlds) | Excellent with AR | Excellent — pixel-level control | Ideal solution for very bright spaces if budget allows | Expensive, limited sizes/availability |
Screen finish: glossy vs matte vs hybrid
Finish determines how reflections are presented.
- Glossy screens: deliver vivid colors and perceived contrast in dim rooms; they produce sharp, mirror-like reflections in bright rooms. Many OLEDs are glossy.
- Matte screens: diffuse reflections to a softer glow, reducing mirror effects but can slightly soften image clarity and reduce perceived saturation.
- Hybrid/hard coatings: combine a low-gloss surface with AR layers to balance contrast and reflection suppression. These are becoming common on high-end bright-room TVs.
Choose based on typical viewing:
- If you can control direct sunlight with blinds, a glossy/AR combination may give the best picture.
- If the TV will face a window with strong, direct sun for long periods, favor matte or hybrid finishes with proven AR coatings.
Room setup tips to reduce glare and get the most from a bright-room TV
Small changes to your room often beat swapping TVs. Practical steps:
1. Control the light source
- Use blackout or light-filtering curtains/blinds to block direct sun during daytime viewing.
- Reposition lamps so they don’t face the screen at eye level.
2. Positioning and mounting
- Avoid placing the TV directly opposite large windows. If unavoidable, angle the TV or mount it higher/tilted to change incident reflection angle.
- A ceiling-mounted tilt or wall mount with a downward angle often reduces window reflections.
3. Surface and furniture considerations
- Matte walls and low-reflectance surfaces reduce room glare overall.
- Rugs and soft furnishings absorb light and reflections; glass tables increase reflected glare.
4. Bias lighting
- Use neutral 6500K bias lighting behind the TV to improve perceived black levels and reduce eye strain in bright rooms.
5. Use of polarizing sunglasses or screen protectors
- Avoid sunglasses for normal viewing. Quality polarization filters applied to displays can reduce reflections but may affect viewing angles and colors.
6. Light direction is more important than light strength
- A lamp at a shallow angle to the central viewing position causes worse reflections than a brighter light placed off-axis.
Daylight calibration: step-by-step to optimize an already bright setup
Calibration in a bright room aims to keep the image natural and retain highlight detail without crushing midtones. You don’t need professional gear to get a big improvement; a colorimeter helps for precise results.
Step-by-step SDR calibration (quick method):
1. Start with the right picture mode: choose “Movie” / “Filmmaker” / “Cinema” if available — these are typically the most accurate baselines.
2. Turn off dynamic contrast or aggressive “AI” picture enhancements that clip highlights to boost perceived brightness.
3. Set the backlight (or “OLED light”) first to a level that makes whites look bright without clipping: in bright rooms raise it higher than you would in a dark room. If your TV shows a brightness percentage, use that as a reference and fine-tune visually.
4. Adjust contrast so 100% white is bright but not detail-less. Use a white-screen or a 10% window test pattern to ensure highlights show texture.
5. Set brightness (black level) to preserve shadow detail; in bright rooms you may need to slightly raise this compared to a dark room setting to avoid crushing midtones.
6. Color temperature: choose a “Warm2” or “6500K” preset if available; warmer settings preserve natural skin tones in daylight.
7. Turn on ambient light sensors if the TV’s automatic adjustments are accurate in your experience; otherwise turn them off and rely on manual backlight control.
Step-by-step HDR calibration (basic guidance):
1. Use an HDR test pattern (10% window, 100% white, etc.). Understand that some HDR peak spec values are scene-referred; the TV must tone-map to its peak capability.
2. Set HDR OLED light/backlight to a high but sustainable level — avoid pushing the panel into clipping.
3. Monitor the 10% and 2% windows for highlight roll-off and compressed detail. Reduce “HDR tone mapping” aggressiveness if it crushes midtones.
4. If your TV offers “HDR Brightness” or “Dynamic Tone Mapping” options, test them with real content — some implementations provide better everyday results in bright rooms.
Using a colorimeter or calibration tool:
- A colorimeter with calibration software (CalMAN, DisplayCAL) gives the best results. Target SDR white point at D65/6500K and gamma around 2.2–2.4 depending on ambient light.
- Aim for a higher target luminance for SDR than you would in a dark room. For example, instead of 100–120 nits (typical reference), a bright living room may require 200 nits or more for comfortable viewing; use your eye and meter to balance brightness vs. clipping.
Practical tone-mapping tip:
- If outdoor sunlight “steals” perceived contrast, raising the midtone gamma slightly (lower gamma number) can help keep detail visible. Don’t overdo it—film intent can be degraded.
Final buying checklist for bright rooms
- Prioritize sustained brightness over short peak spikes.
- Look for Mini-LED or high-end LCD with many local-dimming zones plus a strong AR filter.
- Consider OLED only if you can control direct sunlight or the model specifically advertises higher peak brightness and robust anti-reflective coatings.
- Test TVs in-store at an angle and with lights on (if possible), and bring a device that simulates your living room light angle (your phone flashlight will do).
- Account for room fixes (blinds, angles, bias lighting) — they can reduce the premium you’d pay for extreme peak brightness.
FAQ
Is OLED a bad choice for bright rooms?
No — OLED still offers the best contrast and viewing angles. However, its lower typical peak brightness vs. top Mini-LED sets makes it less ideal for rooms with constant direct sunlight unless you can control reflections or choose a higher-brightness OLED variant with strong AR coatings.
How many nits do I need for a bright living room?
There’s no single number, but aim for a TV that can sustain noticeably bright luminance across scenes. As a rule of thumb, TVs that can sustain higher-than-typical SDR brightness (well above studio reference) and reach strong HDR highlights will perform better in daylight; Mini-LEDs generally provide the most headroom.
Do anti-glare films reduce picture quality?
Lower-quality aftermarket films can soften the image and reduce color accuracy; high-quality factory AR coatings or carefully engineered hybrid finishes are preferable. If you must use a film, choose one designed for TV displays and accept minor compromises in exchange for much lower reflections.
Should I leave the TV’s ambient light sensor on?
Test it both ways. Ambient light sensors can improve the viewing experience by adapting brightness automatically, but some implementations overcompensate or alter color balance. If the sensor dulls color or causes frequent distracting shifts, switch it off and use manual calibration with a higher base backlight setting for daylight.
This article was written and reviewed by the SmartTechTVs editorial team. Read our About